I’ve been photographing the Milky Way for a few years now, for the most part always going for the darkest locations I could find. It’s a lot of fun to be out in the middle of nowhere at night, photographing the night sky. (Also creepy, ever since I heard some grunts while I was in the dark, miles away from any other human, turned on my headlamp, and saw the eye shine of a very large animal looking back at me!)
However, a photo with just the Milky Way isn’t particularly interesting. The part I’ve struggled a bit with is getting a good foreground in the shot. I have one good success, but the biggest problem I’ve had is getting a foreground that is more than just a silhouette. So I decided to try to tackle this issue in a particularly challenging situation: bright foreground lights!
Well, bright is a relative term. In reality, they weren’t unusually bright… they weren’t particularly blinding to look at with night-attuned eyes. Of course, it doesn’t take a lot of light to mess up shots exposed for the night sky! I decided to photograph the Milky Way with a fancy lighted gatehouse in the foreground, a mountain behind it, and the Milky Way behind that.
Shooting the foreground
I knew that I was going to need shots with multiple different exposures. I started, while I was waiting for the Milky Way to move into the position I wanted, by getting my camera set up and taking some test shots. Once I had the scene framed the way I wanted, I took a lot of shots bracketing the exposure. I wasn’t sure exactly what the right exposure for the gatehouse was going to be, so I tried to cover all the bases.
When I was back at home, the image I settled on for the gatehouse was this one:
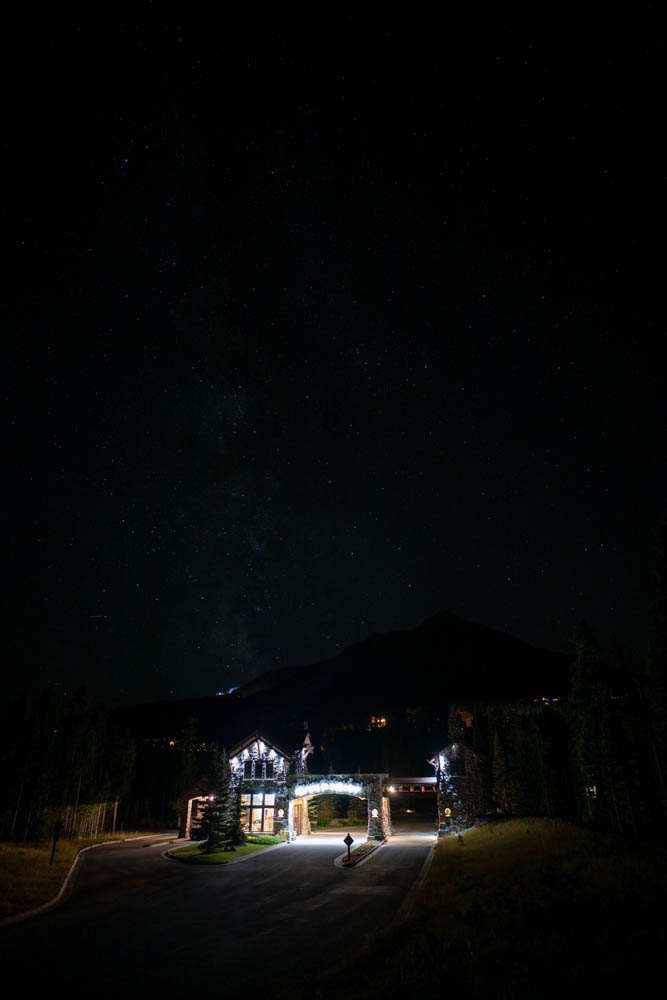
This image was captured with my Nikon Z8 and 20mm lens, at 4 seconds, f/1.8, and ISO 160. As you can see, the gatehouse itself is exposed fairly well for a night photo, where you don’t want it to be too bright. Of course, as expected, the rest of the photo is almost black, with just a hint of Milky Way in the sky.
Shooting the Milky Way
Once the Milky Way was in position, I went through my usual routine of capturing images to stack, as described in my previous post on photographing the Milky Way. I captured 16 images at 4 seconds, f/1.8, and ISO 5000, which exposed the rest of the scene nicely. (I actually captured several sets of 16 images, then selected the set I liked the most.)
After stacking and doing some initial adjustments on the resulting image in Lightroom, I came away with this photo:
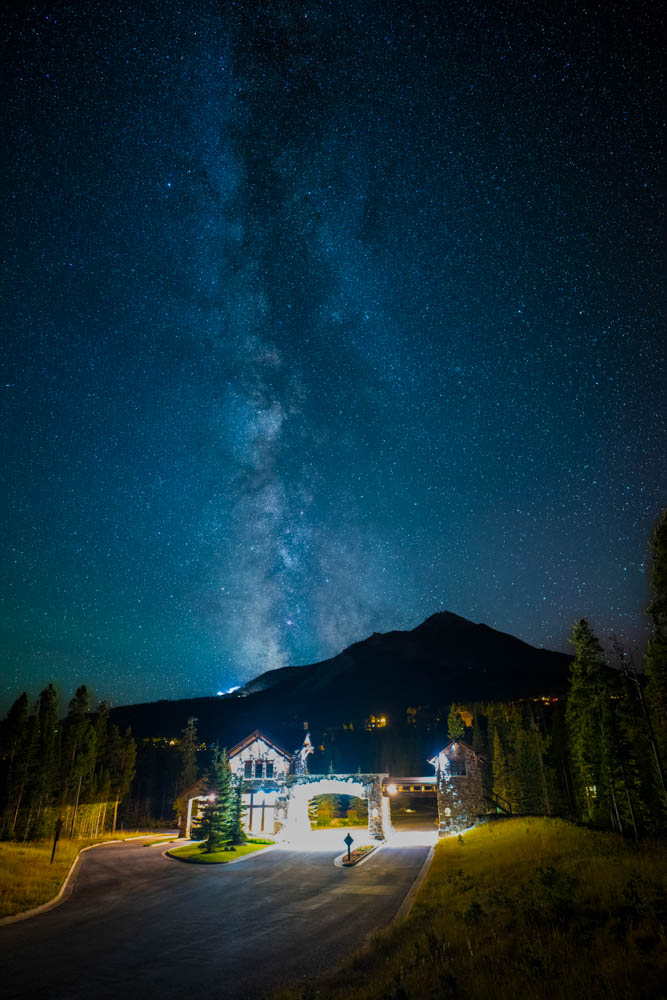
This is a pretty pleasing image overall, except for the foreground. The gatehouse is pretty blown out, and I’d done some adjustments to the exposure in the foreground so it wasn’t just glaringly bright, but the foreground still isn’t pleasing and looks a bit unnatural. So how do I fix this?
Combining foreground and background
My Photoshop skills have always been a bit weak, and my first attempts at combining the images were spectacular failures. I layered the two images in Photoshop and erased portions of the one in front, but I couldn’t get it to look natural. There was always something about the results that made it extremely obvious the image had been edited.
Fortunately, I finally hit on an idea that worked. I loaded the image exposed for the Milky Way in Photoshop as the first layer, and the image exposed for the gatehouse in the second layer (behind the first). Then, with the first layer selected, I clicked the Layer Mask button to create a mask on the first layer.
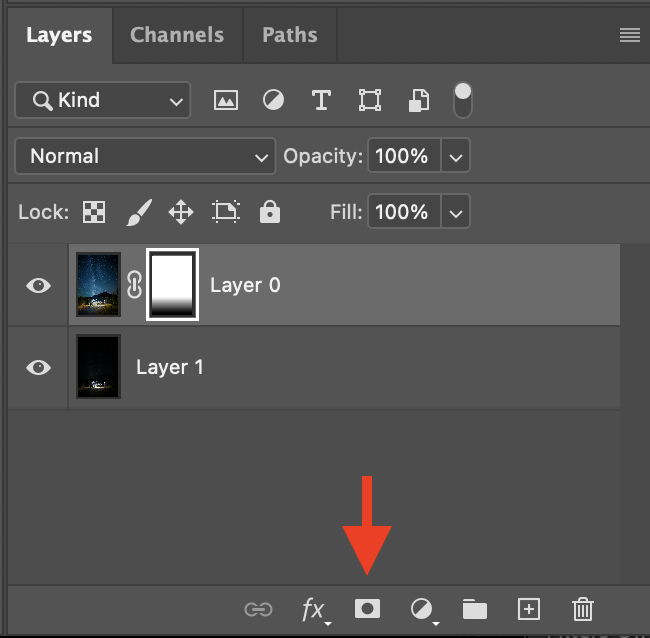
A layer mask essentially specifies what parts of that layer are going to be transparent. White in the layer mask means fully opaque, so none of the bottom layer shows where the mask is white. Black means fully transparent, so the next layer down is the only one you see where the mask is black. All grays between specify different levels of transparency – lighter gray meaning less transparent – so the two images are somewhat mixed.
Next, with the layer mask selected, I used the gradient tool to draw a gradient. I could immediately see the results, as I drew, so I just adjusted the gradient until I was happy with the results.
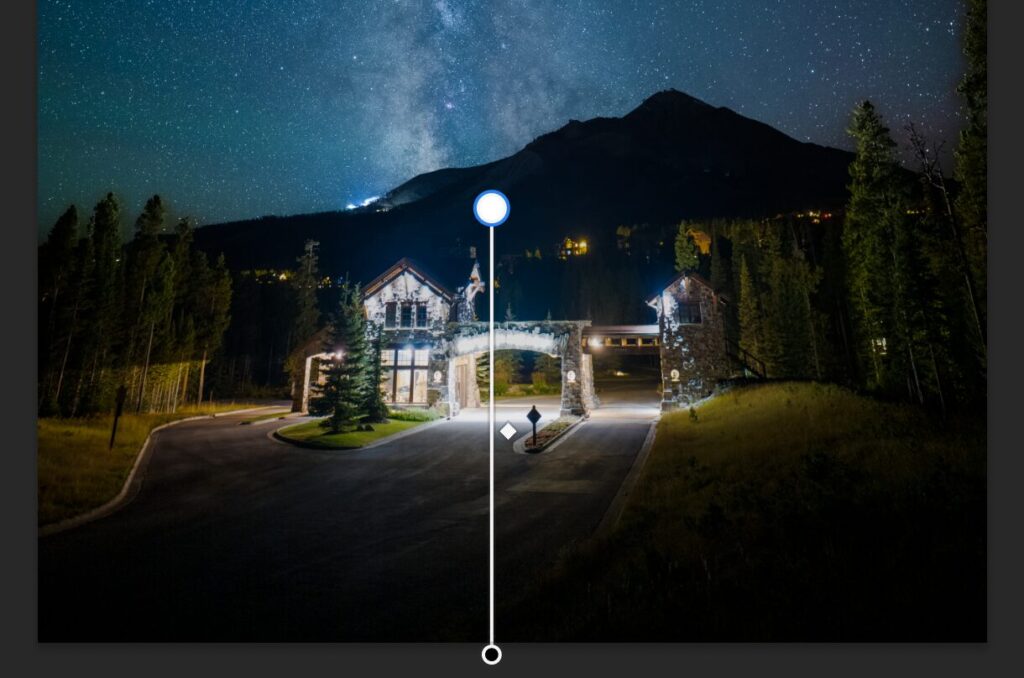
Above, you can see the gradient tool showing circles where white and black are. Along the line between, the gradient transitions from fully black (transparent) to fully white (opaque). I simply dragged the white circle up and down until i was happy.
I kept the shift key depressed while dragging, to constrain the gradient to being perfectly vertical. However, if I had wanted to, I could have created a slightly diagonal gradient instead. That was not needed for this image, but I can see situations where I would be.
Final results
I’m pretty happy with the final results. I do wish that the text along the top of the arch – black, backlit metal letters reading “Welcome to Moonlight” – was legible. However, the only image where those letters were visible was so dark that I could not find any way to blend it into the image in way that didn’t look really bad.

I hope this post gives you some ideas, and if you use this technique to create interesting images of your own, I’d love to see them!